
Make sure an antenna or dummy load is connected to the antenna the band uses. Keying into no load can damage the radio. For setting up audio, PureSignal and power, use a dummy load.
Setting up to transmit
- Choose your microphone in Config > Audio: a computer mic, or the radio's mic jack.
- Check your band plan and callsign in Config > Station.
- If you use an amplifier, set its maximum drive before anything else. See The Amp button.
- Set your power. Click TX and set DRIVE. Set TUNE low.
- Set your mic gain. Turn on Mon to hear yourself without transmitting, speak normally and set MIC in the same popup.
- If your PTT is a foot switch or the radio's PTT input, set it in Config > Station.
Keying
- MOX transmits until you click it again.
- TUNE sends a steady carrier at the tune level, for antenna tuners.
- VOX transmits when you speak. See VOX below.
- Your microphone's PTT or a foot switch works too, once it's set in Config > Station.
- Logging and digital programs key the radio over TCI or CAT.
Power and mic levels
The TX button, with the transmit controls, shows your power and opens three levels.
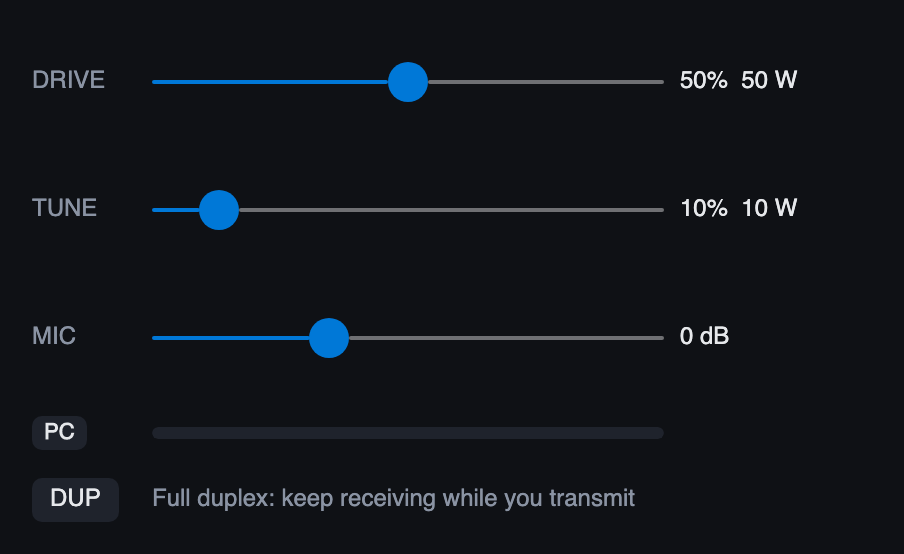
- DRIVE sets output power. It's your RF power control.
- TUNE sets the power used by the TUNE button. Keep it low.
- MIC sets microphone gain, with a level meter under it.
- DUP keeps you hearing the receivers while transmitting.
Each power slider shows a percentage of its full travel and the power in watts. With a maximum drive set in Config > Amp, the top of the slider is that maximum.
Drive is remembered for each band and each mode, so your FT8 power on 20 m doesn't follow you to SSB on 40 m.
Setting the mic gain
Speak normally and watch the meters. Aim for steady ALC movement rather than maximum. If your audio sounds harsh, turn it down.
Meters while transmitting
| PWR | Output power, from the radio's own meter. That meter can read low, so check it against an external one. Config > PA can correct it. |
| SWR | How well the antenna matches. Stop and check if it's high. |
| ALC | The transmit audio being held back to stop overdriving. Its bar runs to 20 dB: green is fine, orange from 10 dB, and red from 15 dB means turn the mic gain down. On FM it shows deviation (DEV) instead, red when over full deviation. |
Hearing yourself
Mon steps through:
- Mon: your mic through the transmit chain, without transmitting. Ideal for setting up audio.
- TX Mon: hearing yourself while transmitting.
- Mon+TX: both.
Use headphones. Right-click for the level.
VOX
VOX transmits when you speak. It works in voice modes, turns off when you disconnect, and is off each time the app starts.
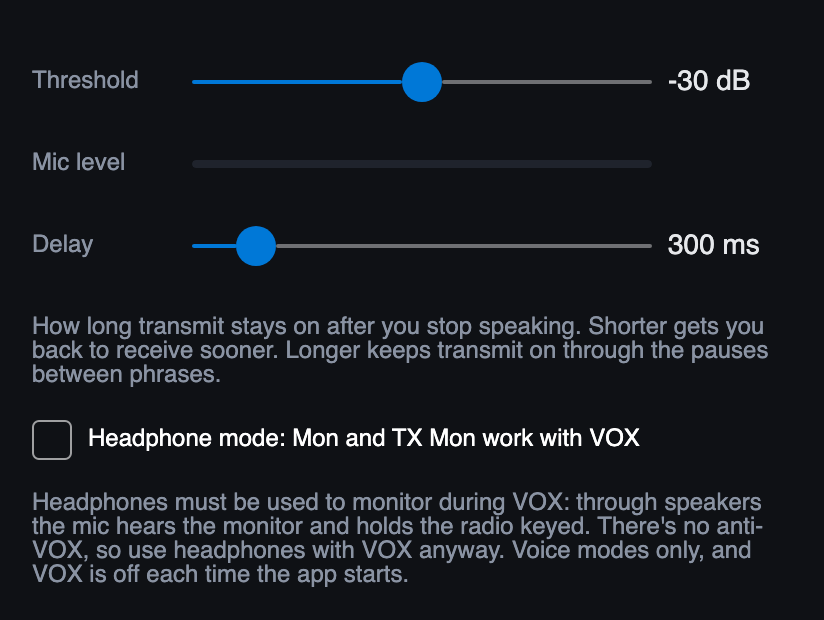
- Threshold: set it against your mic level, shown under it.
- Delay: how long transmit stays on after you stop speaking. It starts at 300 ms. A short delay gets you back to receive sooner, which suits a fast-moving group. A long one keeps transmit on through the pauses between phrases. If VOX drops in the middle of your sentences, lengthen it. Going much below 300 ms gains little, because your last word is still on its way out of the transmit processing.
- Headphone mode: see below.
There's no anti-VOX, so sound from speakers can key the radio.
VOX and Mon
While VOX is on, Mon is paused: its button goes dark but keeps your setting, and the status line says so. Turning VOX off brings Mon back as you had it.
This is because VOX listens to your mic, and Mon plays your voice. Through speakers, even quiet ones, the mic hears Mon. VOX takes that for you still talking: it keys the radio on its own, and with TX Mon the transmit audio keeps VOX open, so the radio stays keyed sending that feedback until you unkey it.
With headphones on, right-click VOX and tick Headphone mode: Mon and TX Mon then keep working while VOX is on. Leave it off if you ever use speakers.
When transmit stops by itself
The engine protects the radio, and a red banner in the main and mini windows says why it stopped you. It stays until you click Dismiss or transmit again.
| SWR too high | SWR stayed above the limit for half a second. Check the antenna and tuner before transmitting again. The engine always stops MOX at 2.5:1, and TUNE at 6:1 above 35 W. You can set a lower limit for MOX, and an amber warning before it, in Config > Amp. |
| TX timeout | You were keyed longer than the limit in Config > Amp. An amber warning appears shortly before, while you can still unkey. It goes when you do. |
| Out of band | With Block transmit set in Config > Station, your band plan doesn't allow the frequency or mode, so transmit stopped or never started. With Warn only, an amber banner tells you instead and you stay on the air. General Coverage does neither. |
| External fault | Hardware connected to the radio reported a problem. |
VOX turns itself off after any of these, so it can't key straight back into the same fault. PS CAL, queued CW and two-tone stop too. If you use a paddle, it stays off until you transmit once some other way, such as MOX.
The Amp button
Amp, with the transmit controls, tells SimpleHPSDR whether your amplifier is in line.
- Amp on (blue): Drive and Tune can't go above the amplifier's maximums.
- Amp off: the sliders go to the radio's full power.
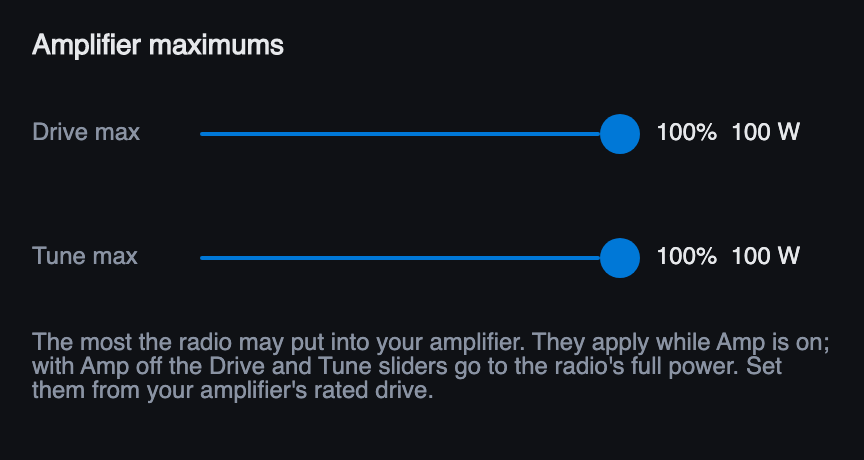
Right-click Amp to set the maximums, one for Drive and one for Tune, from your amplifier's rated drive. They're also in Config > Amp.
Each setting remembers its own Drive and Tune levels, so switching Amp brings back the levels you last used that way. Levels are kept per band, and separately for sideband (USB and LSB together), CW, AM, FM and each digital mode.
What else the button switches
Config > Amp says what else the button switches, so the amplifier really is in or out of line:
| Nothing | Only the limits change. A key cable on the radio's PTT OUT jack keys the amplifier on every transmission and software can't stop that, so put the amplifier in standby yourself before you turn Amp off. |
| A radio output | Move the key cable from PTT OUT to one of outputs 1 to 7. That output is on while transmitting with Amp on, and never with Amp off. |
| An RF2K-S amplifier | Give its network address. Amp on puts it in operate and Amp off puts it in standby. Amp only goes off once the amplifier confirms standby, and the button follows the amplifier if you switch it at the amplifier. |
Amp can't be switched while transmitting. When it switches nothing else and the amplifier is still in line, full drive can overdrive it.
Transmit audio
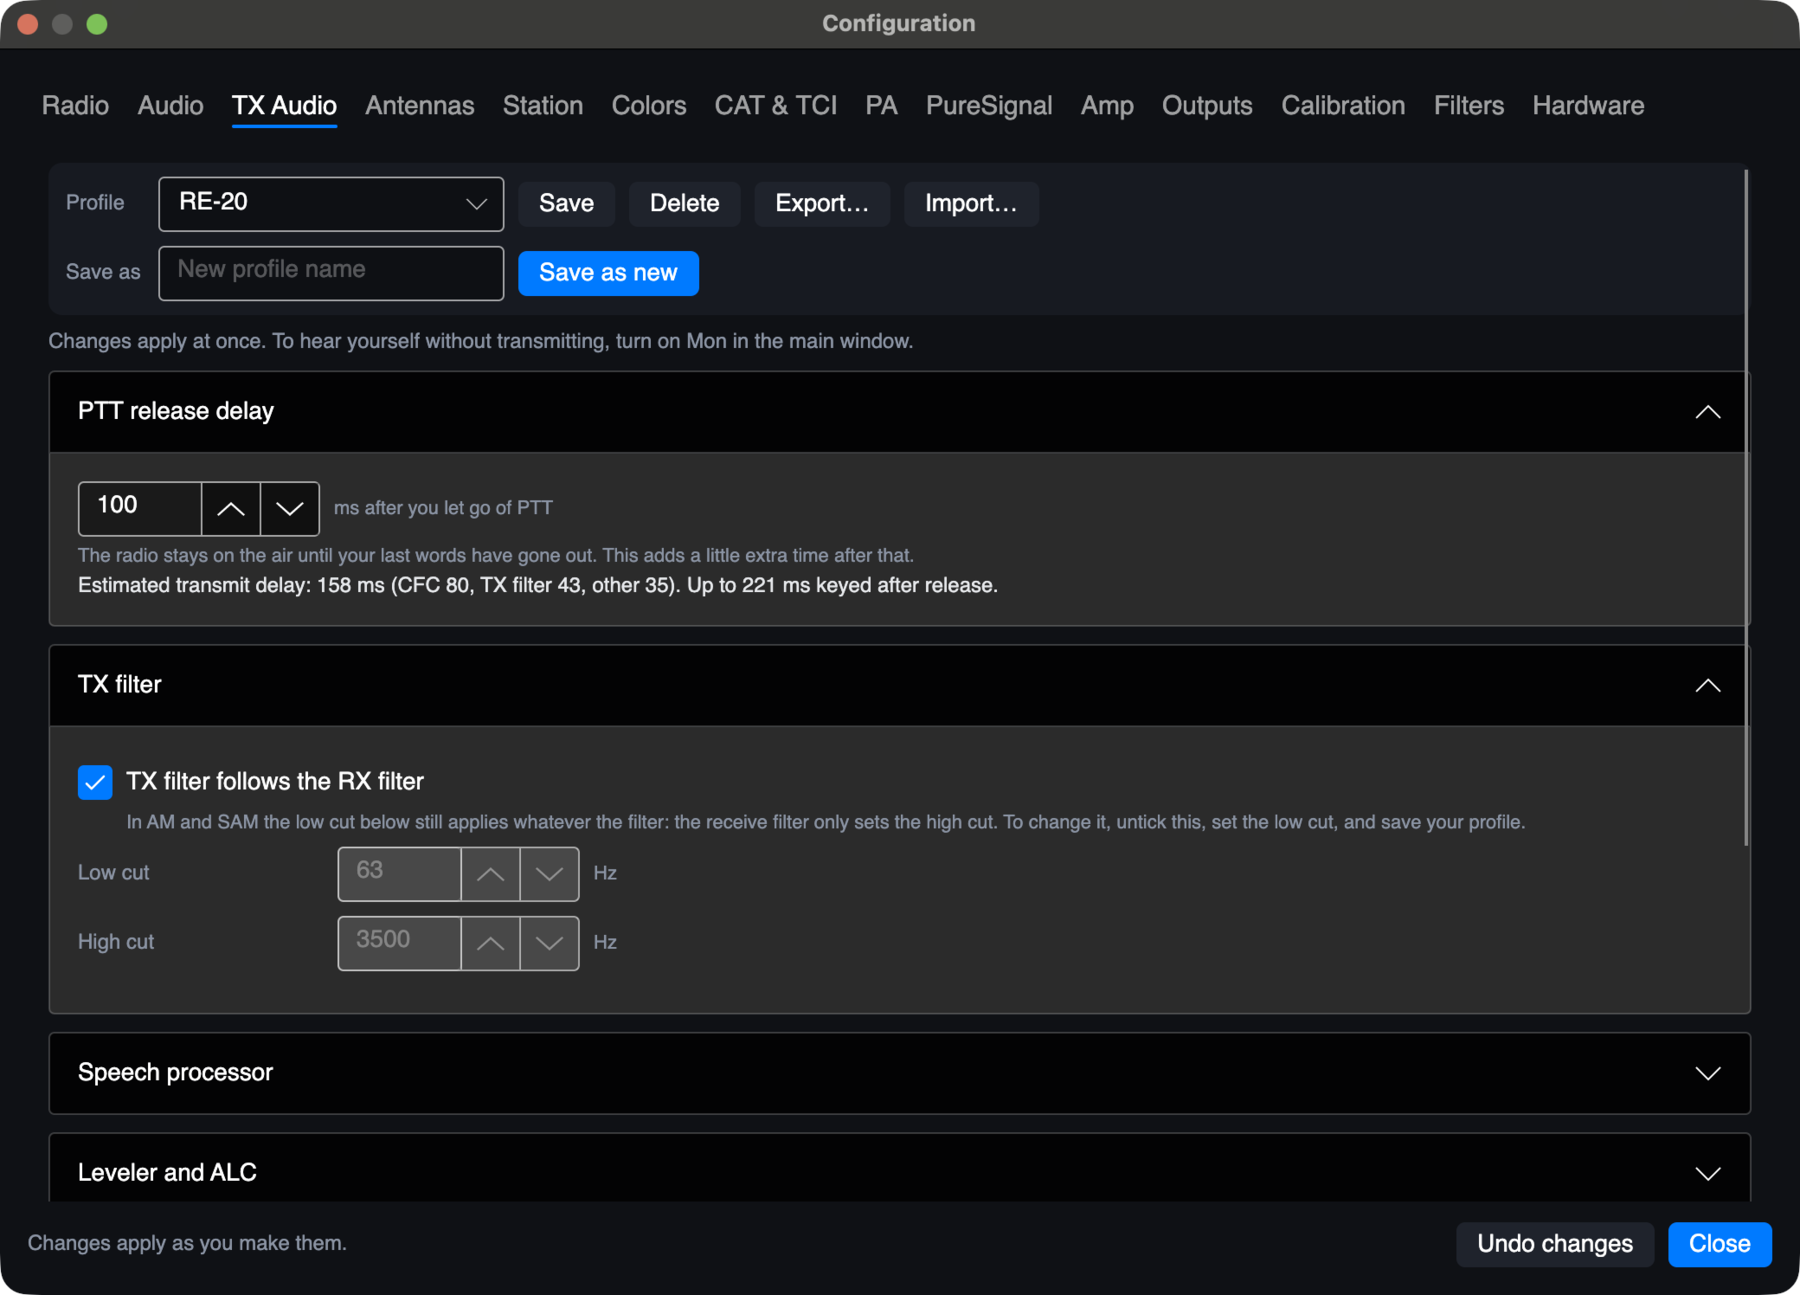
Config > TX Audio holds everything that shapes your voice, in the order it's processed. All of it is optional. Changes apply at once, so turn on Mon, put on headphones and listen as you adjust.
Profiles
Save your settings under a name and load them later: one for DX, one for ragchewing. Default is built in and can't be overwritten. A profile holds only what's on this page, and it applies in every mode, so make a separate profile if you want different settings for AM, say. PureSignal settings aren't part of a profile.
Sharing a profile: Export… saves the chosen profile to a .shtx file you can send to another SimpleHPSDR user. They press Import…, pick the file, and the profile is added to their list and loaded at once. If the name is taken, the imported one gets a number. A profile holds nothing about your radio, its power or its calibration, so it's safe to share. Export writes the profile as last saved, so press Save first if you've changed something.
The sections
| PTT release delay | A short extra wait after you let go of PTT. The engine already holds transmit for the speech still in the chain. Raise this if the end of your transmissions is cut off. |
| TX filter | How wide your signal is. "TX filter follows the RX filter" ties it to your receive filter. Otherwise set both cuts by hand: the high cut goes up to 10 kHz (8 kHz of audio in FM). 2.8 kHz is a usual SSB width; wider is for AM and wide-band SSB, where the band and your licence allow it. |
| Speech processor | Compressor and CESSB add talk power. Use them lightly. |
| Leveler | Keeps your level steady as you move around the mic. It's the first thing to turn on. |
| Equalizer | Shapes the tone of your voice. The graphic view has ten sliders. Tick Parametric for six bands instead: drag a numbered point for frequency and gain, and use the wheel over it for Q. Bands 1 and 6 can be a pass filter or a shelf. The dashed line is what the radio actually does. |
| CFC | A compressor working across the whole audio range at once. Compression in dB is the gain given to quiet sounds, and everything is held to the same ceiling, so more dB means more compression. Post gain then shapes the result. CFC adds delay, from about 16 ms at an FFT size of 2048 to about 166 ms at 16384. |
| Noise gate | Quiets the mic between words. |
| Phase rotator | Evens out the peaks in a voice, so it's easier to process. |
The page shows the estimated transmit delay as you change things. CFC and the TX filter shape are the two biggest parts of it.
In AM, SAM and DSB the receive filter covers both sidebands, so with "follows" ticked your audio goes up to half its width: a 10 kHz AM filter sends audio up to 5 kHz. In AM and SAM the low cut still applies either way. To change it, untick follows, set the low cut and save your profile. CW and FreeDV don't use the TX filter.
PureSignal
Every amplifier distorts a little, which splatters onto nearby frequencies. PureSignal samples your transmitted signal, compares it with what it should be, and corrects for the distortion, for a much cleaner signal.
Setting it up
The first time you turn on PS, a guided setup opens. It asks where the sample comes from, has you confirm that a dummy load is connected and your usual power is set (and, with an external amplifier, that it's on and ready), then calibrates. It takes about a minute.
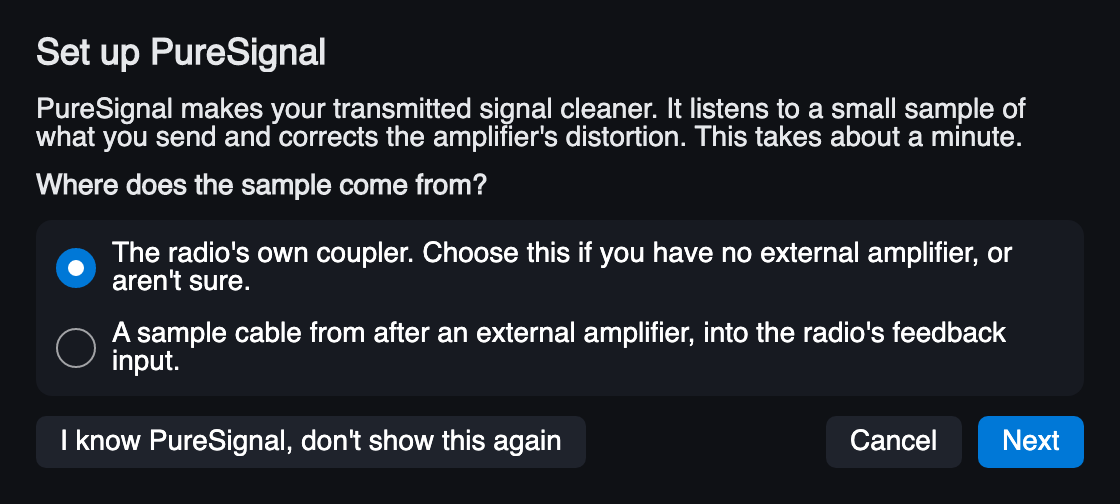
- The radio's own coupler: choose this if you have no external amplifier, or aren't sure.
- A sample cable from after an external amplifier, into the radio's feedback input.
You can run it again any time from the PS right-click or Config > PureSignal.
The PS button
- Green: on and correcting your signal.
- Yellow: on but not correcting yet. Transmit for a few seconds, or run PS CAL.
- Grey: off.
Day to day
After the setup you rarely need to calibrate again. While you transmit, PureSignal keeps adjusting the correction from your own speech, about once a second, so it follows changes in power and band by itself.
"Remember the correction for each band" is on to start with. After an over that updated the correction, it is saved for the band you are on. Next time you connect, or come back to that band, PureSignal starts from the saved correction, so your first words are already clean.
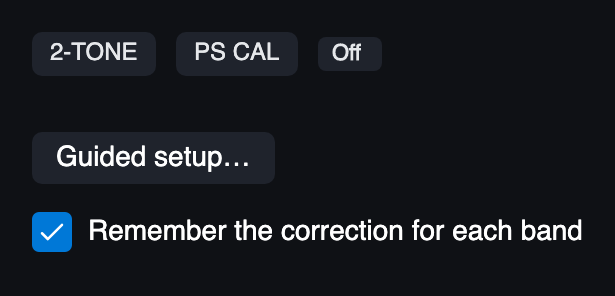
| PS CAL | Recalibrates by hand. Connect a dummy load and press it: it keys the radio in short two-tone bursts until PS turns green. |
| 2-TONE | Transmits a two-tone test signal. While it's on, the panel shows IMD3 and IMD5: how far the 3rd- and 5th-order products sit below the tones, in dBc. More negative is cleaner. With PureSignal on, leave 2-TONE on about 15 seconds and the panel shows the uncorrected and corrected IMD3 and the difference. |
| Status | The feedback level (FB), which is best around 128 to 181; when the correction was last updated; and a line in plain words saying what PureSignal is doing and what to do if it's stuck. |
| Guided setup… | Runs the setup again. |
Both PS CAL and 2-TONE transmit, so use a dummy load.
Run PS CAL again, or Reset calibration in Config > PureSignal, after you change amplifier or how the sample is taken: the saved corrections belong to the old setup.
In CW PureSignal isn't used. A CW signal is sent straight to the radio and doesn't pass through the correction. While you send CW it stands still, the PS panel says "Not used in CW" and the PS button is yellow. It picks up where it left off on your next voice transmission.
Recording
REC, beside TX, opens a small tape deck over the bottom of the waterfall. Click REC again to put it away. It stays open while you use the rest of the radio.
- RX / MIC picks what ● records. RX is what you hear on the active slice after the receive filter. MIC is your microphone, for voice keyer messages such as your CQ or call.
- ● starts and stops recording (red while recording). The counter shows the time.
- The name box shows the recording ▶ plays: the newest unless you choose another from ▾. Type in the box to rename it. ✕ deletes one (click twice).
- ▶ plays the chosen recording through your speakers. Receive is muted while it plays. ■ stops it.
Playing a recording on the air
Turn on TX in the deck (it goes red) and ▶ transmits the recording instead, at the TX level set by the spinner, in dB. It keys like MOX, with all the usual checks, and MOX or ■ ends it.
A recording of the receiver goes out as heard, through the TX filter only. A microphone recording goes through your mic gain and transmit processing like live speech. At 0 dB a recording matches your own voice level on the ALC.
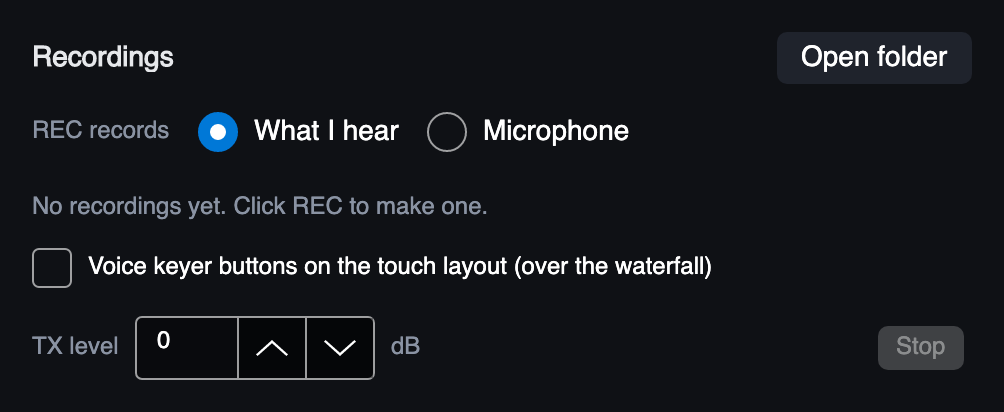
Right-click REC for the full list: rename, delete, listen, transmit and Open folder. Recordings are WAV files in Music/SimpleHPSDR.
The voice keyer
The four grey buttons to the right of REC each transmit one recording.
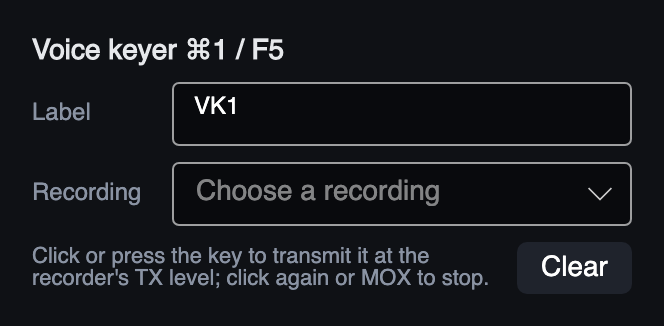
- Record your message with REC set to MIC.
- Right-click a voice keyer button, give it a label such as CQ, and choose the recording.
- Click the button to transmit it, at the recorder's TX level. It's red while on the air. A second click or MOX stops it.
A button with nothing assigned is dimmed.
Keys: ⌘1 to ⌘4 on a Mac, Ctrl+1 to Ctrl+4 on Windows and Linux, or F5 to F8 (on a Mac hold fn, as F5 is dictation).
Getting the power right
Output is Rated power × the DRIVE or TUNE percentage, with each band's PA gain setting how hard the radio is driven to get it. To limit power, use Maximum drive in Config > Amp: at 100 W rated, 25% tops out at 25 W.
The PWR reading is the radio's own meter, and it can be several dB out. If you have a meter you trust, Config > PA has two ways to put the bands and the reading right.