Logging, digital and contest programs
SimpleHPSDR doesn't include a logger or digital modes. Instead it has a TCI server and a CAT server, so the programs you already use can control the radio. Turn them on in Config > CAT & TCI.
| TCI | Suits WSJT-X, JTDX, loggers and skimmers. It carries audio as well as control, so a program that uses TCI audio needs no audio cables or virtual sound cards. Programs see the radio as SimpleHPSDR. |
| CAT | The older method that most logging programs use, over the network or a serial port. It acts as a Kenwood TS-2000, so choose TS-2000 as the radio in the other program. |
- Open Config > CAT & TCI, turn on the server you need and note the port.
- In the other program, choose TCI (or Kenwood TS-2000 for CAT) and give it this computer's address and that port. On the same computer the address is
127.0.0.1. - For digital modes, choose DIGU (or DIGL) so the audio passes straight through.
"This computer only" keeps a server private. Choose Network only if another computer needs it. Network changes need Apply now; the radio reconnects in a few seconds.
While TCI is running, its status shows under the panadapter beside CPU, with the number of programs connected.
Antenna analyser
Tools > Antenna Analyser… sweeps SWR across a band or range and draws it.
Measuring with your radio
"This radio" uses the radio's own SWR bridge. It transmits a low-power carrier, about 5 W, stepping across the range, so it asks before it starts.
- Put an amplifier on standby or bypass first.
- It transmits through the antenna selected for that band. To test the analyser itself, sweep a dummy load: it should show a flat line near 1.0.
- Every frequency is checked against your band plan before it keys. A range outside your licence is refused.
- If your radio gives too little power at the low setting, the analyser raises it a little by itself until the bridge can read it, and puts your TUNE power back afterwards.
- The radio goes back to your frequency when the sweep ends. Stop ends a sweep at once.
A Hermes-Lite 2 uses its built-in analyser instead.
Measuring with a NanoVNA
Plug the NanoVNA in by USB, choose NanoVNA, pick its serial port and press Connect. It measures without transmitting, and also shows impedance (R + jX). Pick only the NanoVNA's port: your radio's CAT or an amplifier's port could be upset by it.
Reading the result
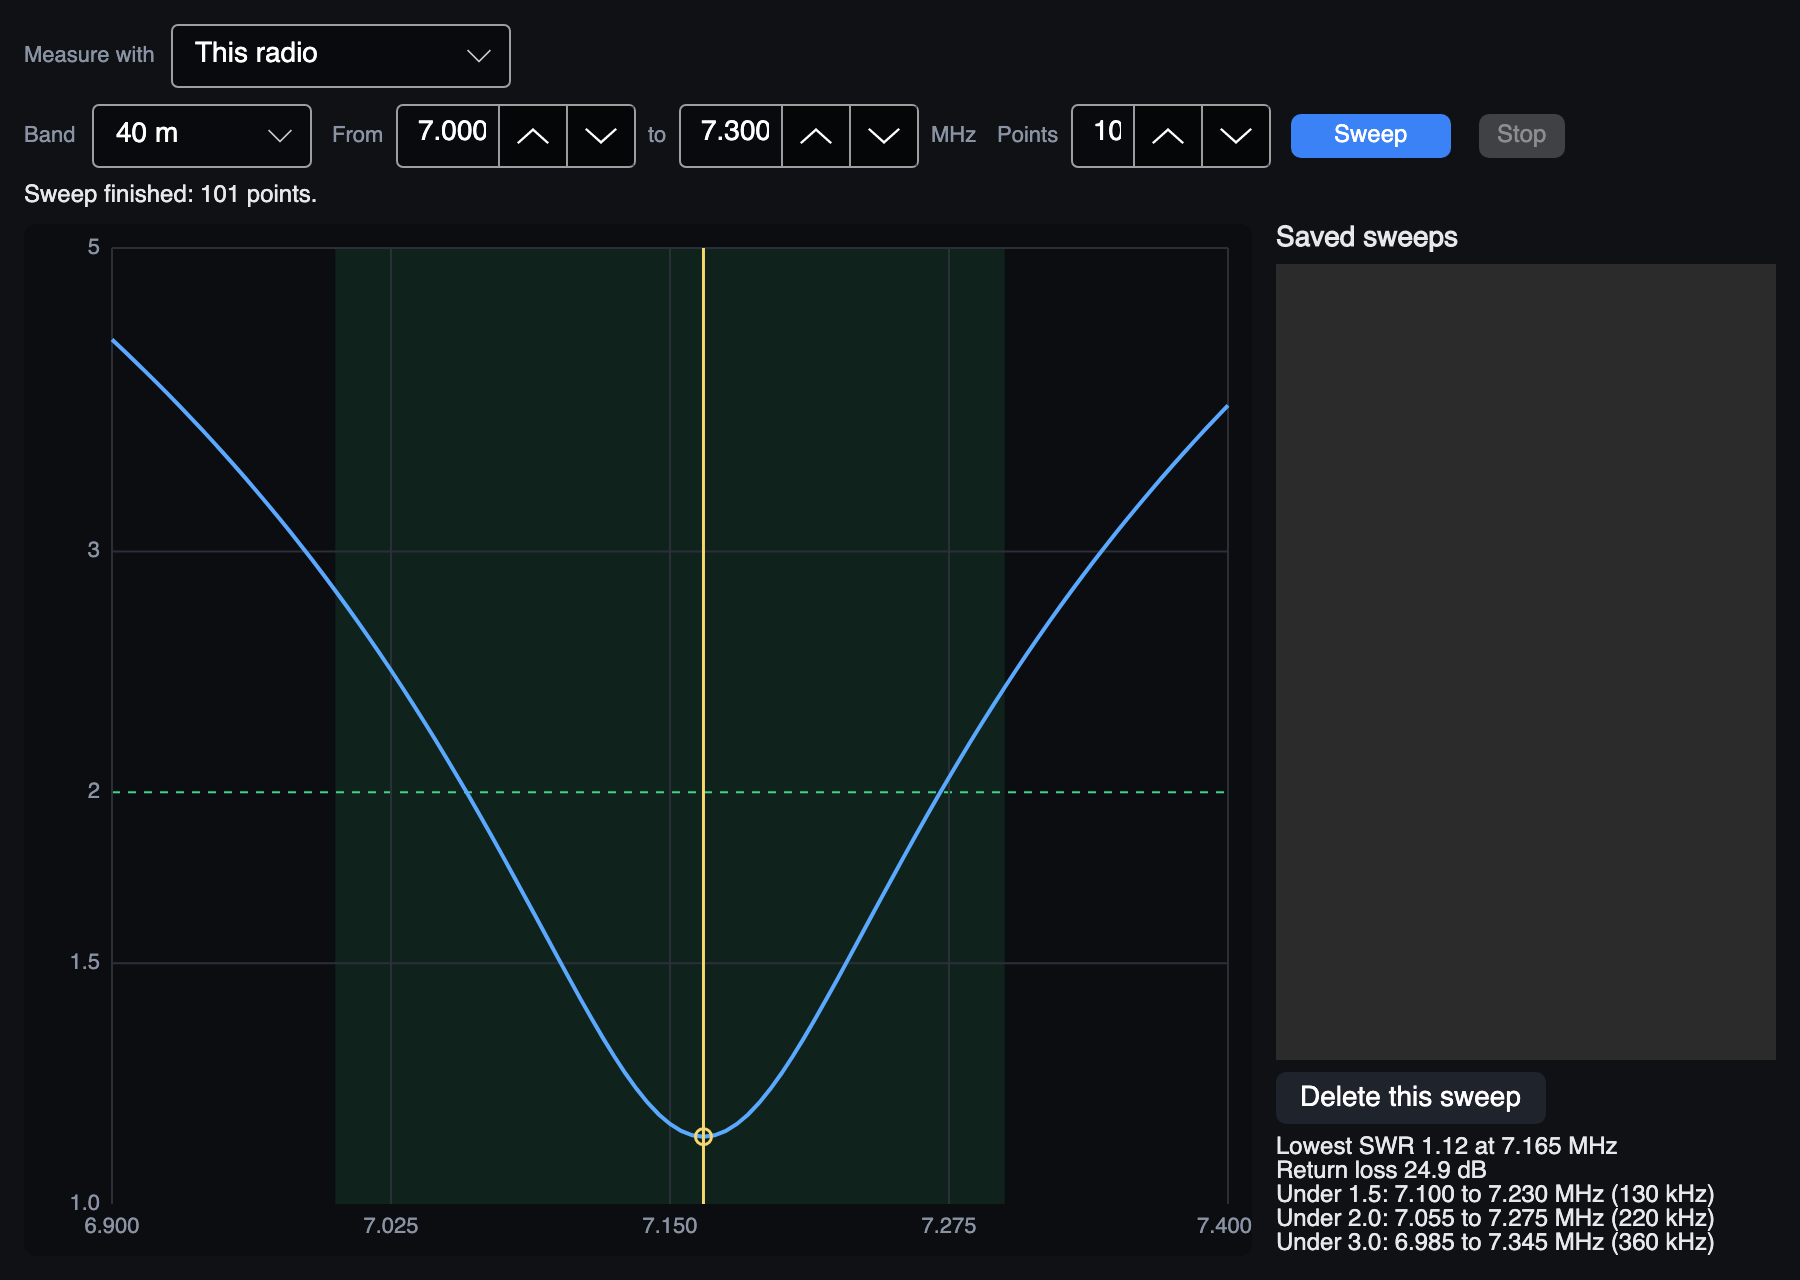
- The graph shows SWR on a log scale, with lines at 1.5, 2 (dashed), 3 and 5. The band is shaded and the lowest point is marked.
- Move the pointer over the graph to read the frequency and SWR at any point.
- Beside it: the lowest SWR and where, return loss, the bandwidth under 1.5, 2 and 3, and impedance and Q when the source measures them.
- Through a manual tuner, the dip shows the tuner's setting: SWR rises as you move away from where it was tuned.
Every sweep is saved in the list on the right: click one to show it again, or delete it. Calibration (open, short, load, thru) appears only for sources that need it.
Wideband view
Tools > Wideband View… opens a window showing 0 to 60 MHz at once, straight from the radio's receiver. It only looks: your frequency, mode and display carry on as they are. It needs a Protocol 2 radio.
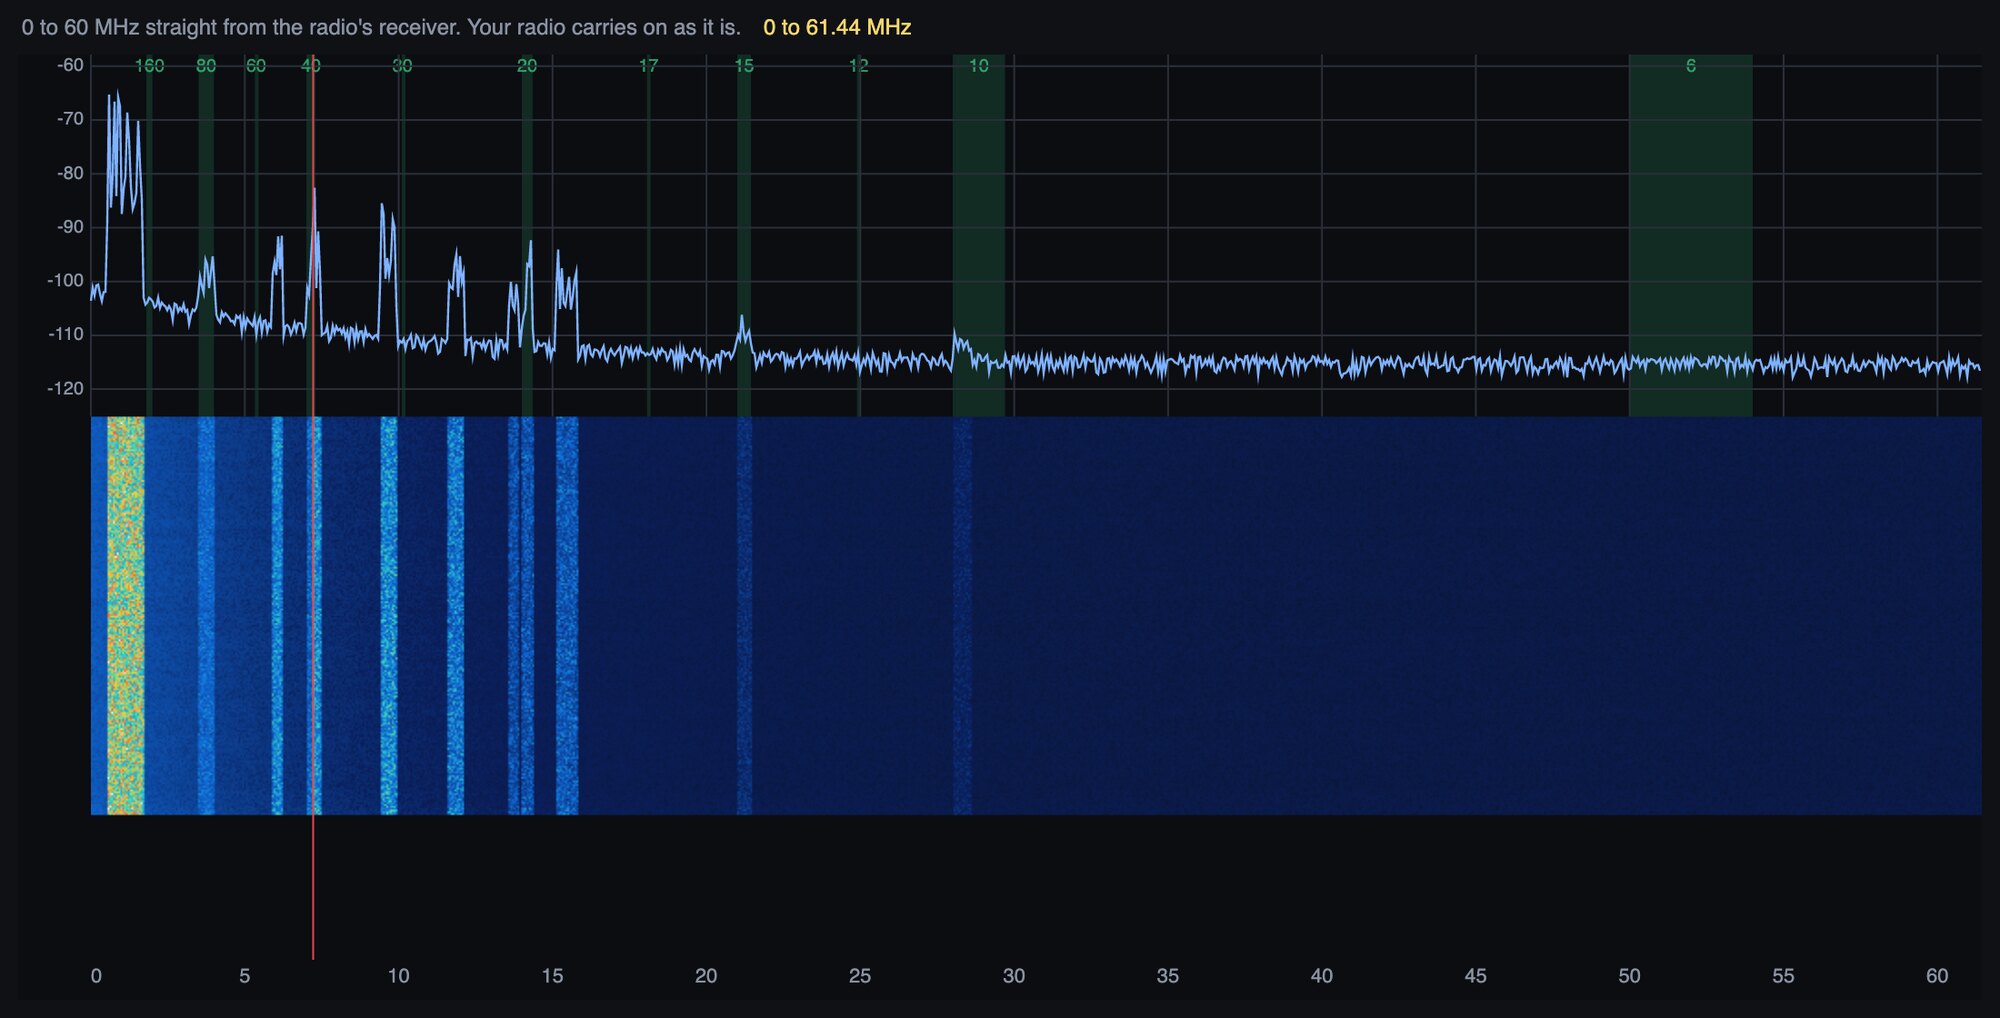
- A trace on top and a waterfall below, with the amateur bands shaded and named. The red line is where your receiver is tuned.
- The level scale follows the signals by itself. Move the pointer over it to read the frequency and level.
- While you transmit the picture holds still.
What it's good for:
- Hunting noise. Arcing or a failing insulator raises the floor everywhere, a solar inverter or switching supply makes a comb of evenly spaced lines, and a single carrier is one line. Switch something off and watch.
- Overload. It shows what reaches the receiver after its filters, such as AM broadcast stations or a strong local, when the overload light comes on.
- Your antenna and tuner. The noise floor rises where they're tuned and falls away either side.
- Band activity at a glance: busy FT8 spots, a contest, 10 m opening, or which shortwave broadcast bands are alive.
Each point covers several kHz, so it shows where signals are, not the signals themselves. Weak signals near the noise don't show.
Clock and ID timer
The clock at the bottom right shows your local time and UTC.
ID timer
Click ID beside the clock to turn on a reminder at each even ten minutes on the clock, while connected to a radio.
- Grey at 00:00: off.
- White: counting down.
- Green: from 5 seconds before the mark to 5 seconds after.
If you're transmitting at the mark, it waits and plays when you unkey. It plays on this computer's speakers and never goes out over the air. Config > Station has the sound, your own .wav, the volume and a Test button.
CW ID
Right-click ID and choose Send my callsign in CW automatically. Your callsign then goes out in Morse as a tone mixed into your voice, at least every 10 minutes of operating. It needs your callsign in Config > Station.
- The box reads CW ID and counts down to the next ID.
- next over (green): an ID is owed and goes out when you next talk.
- sending (green): it's on the air now. If you unkey mid-ID, it finishes first.
It never keys the radio by itself: it only rides on your own SSB, AM or FM transmissions, not CW or digital modes. Turning it off sends one last ID on your next over.
Touch screens and small screens
On a small screen, such as a radio's 1024 by 600 front panel, SimpleHPSDR shows a layout with large buttons instead of the desktop one. Config > Radio > Layout chooses: Automatic uses it on screens narrower than 1080, or pick Desktop or Touch. simplehpsdr --touch or --desktop overrides it for one run. Everything in it works with a mouse too.
On screen
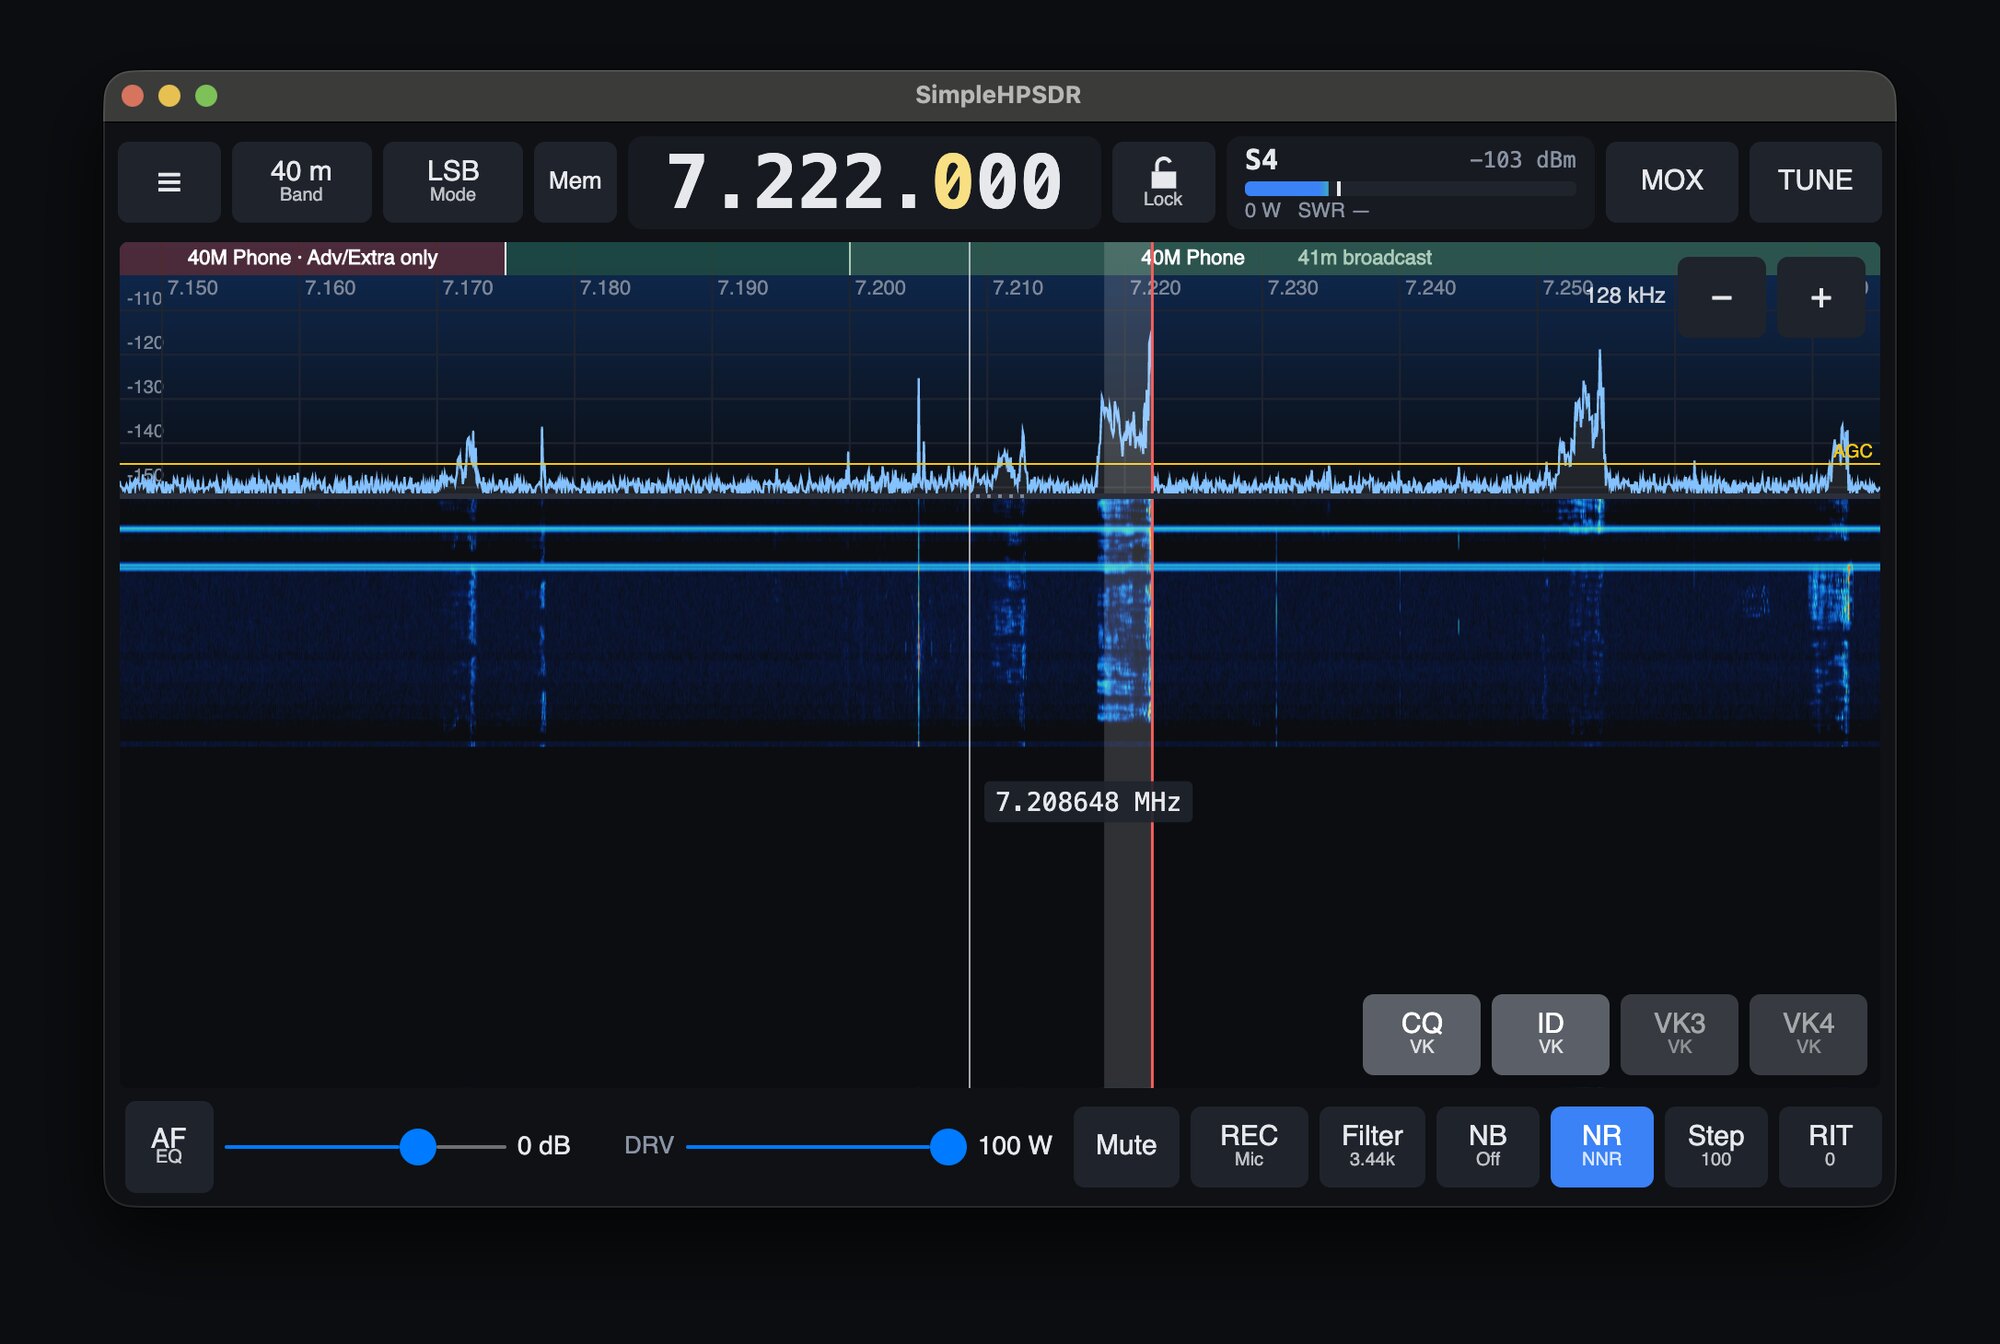
- Top: the drawer (☰), the view button, band, mode, the frequency, the meter, MOX and TUNE.
- Bottom: volume (AF), drive (DRV), Mute, REC, filter, NB, NR, step and RIT. Tap the DRV button for a larger drive slider.
- With RX2 or slice B on, the volume becomes one slider for each receiver, Pan takes the drive slider's place, and the drive is set from the DRV button.
☰ opens a drawer with everything else, in tabs: Receive, Transmit, Slices and Station, with Help beside them.
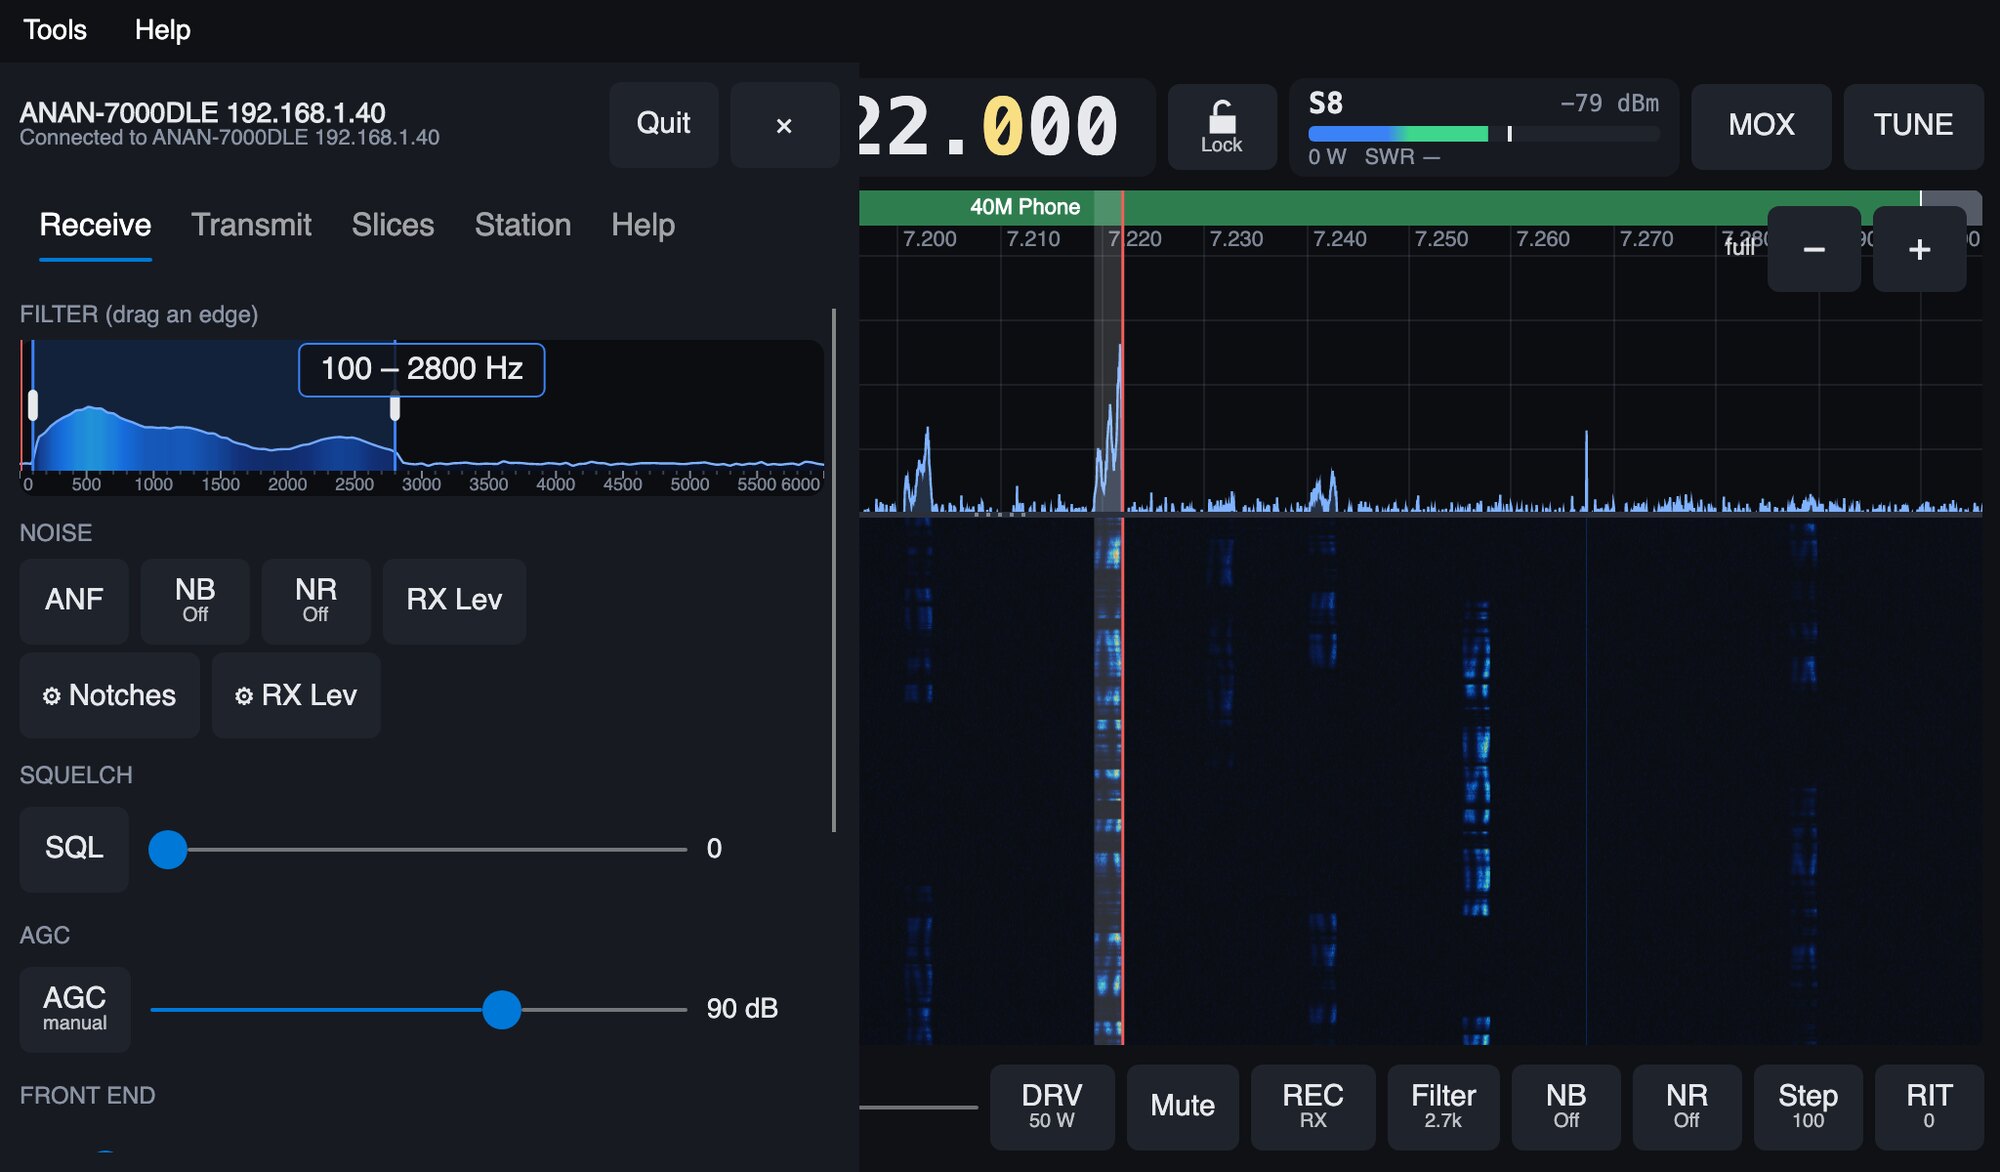
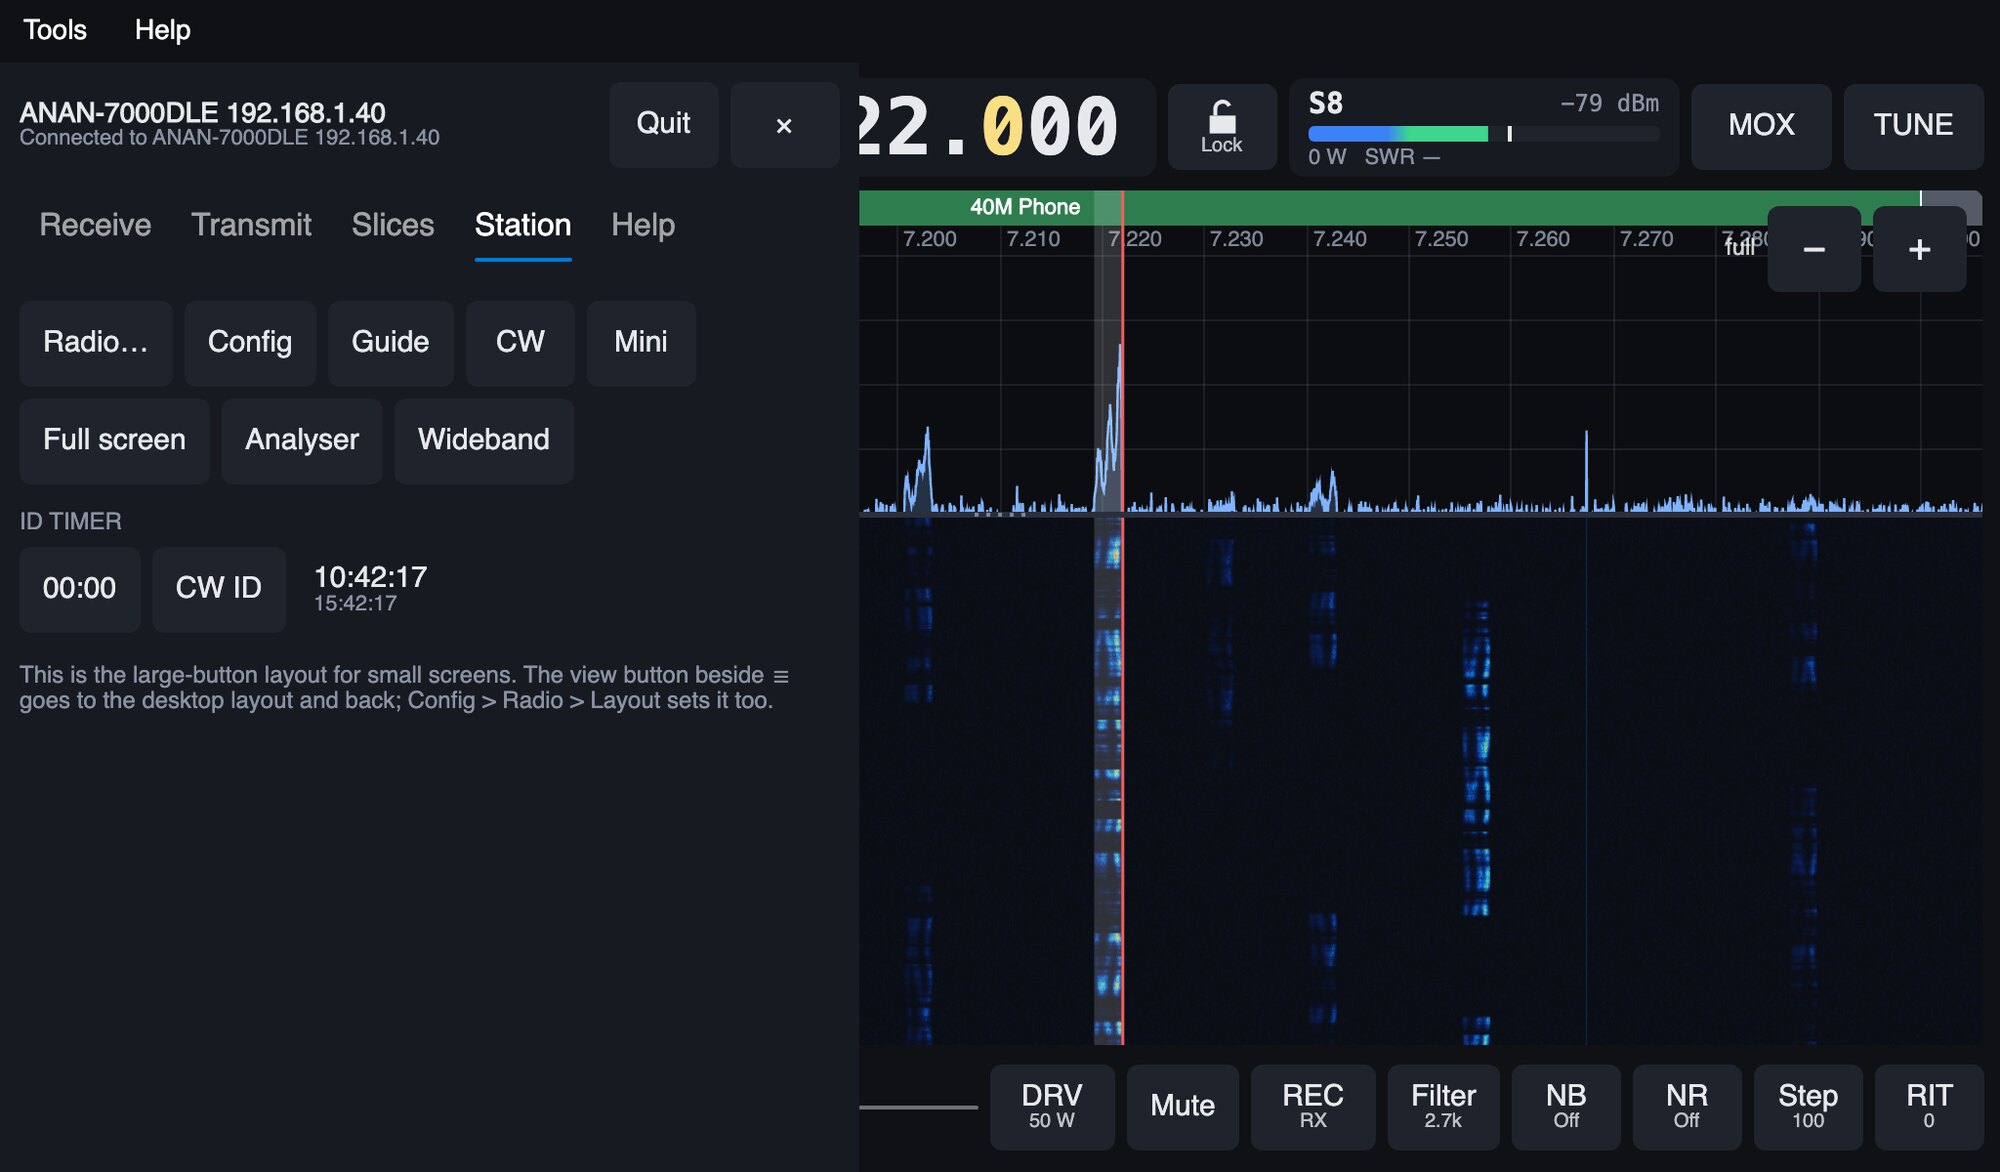
- Station has Config, the station guide, the CW window, the mini window, the antenna analyser, the wideband view and Full screen.
- Slices has RX1, RX2 and RX2 off.
- Quit is at the top of the drawer, beside ✕: tap it, then tap again within 4 seconds.
Tuning by touch
- Drag the frequency sideways: each 20 pixels is one step. The wheel works too.
- Tap the frequency for a keypad: type the number, then press MHz or kHz.
- Tap the spectrum to tune; drag it to slide the band. Let go while still moving and it glides on and slows down.
- Pinch the spectrum to zoom, or use − and + in its corner.
- Lock beside the frequency stops tuning from the screen.
Long press
Holding a finger still for half a second does what a right-click does: on Band it opens the band's saved frequencies, on the spectrum the slice menu (which also offers "Turn RX2 on"), on most buttons their settings.
Changing layout
In the touch layout the view button is beside ☰ at the top left: tap it and pick the desktop layout (controls below or at the side of the panadapter) or the small window. In the desktop layout, right-click the view button under the panadapter and choose Touch layout.
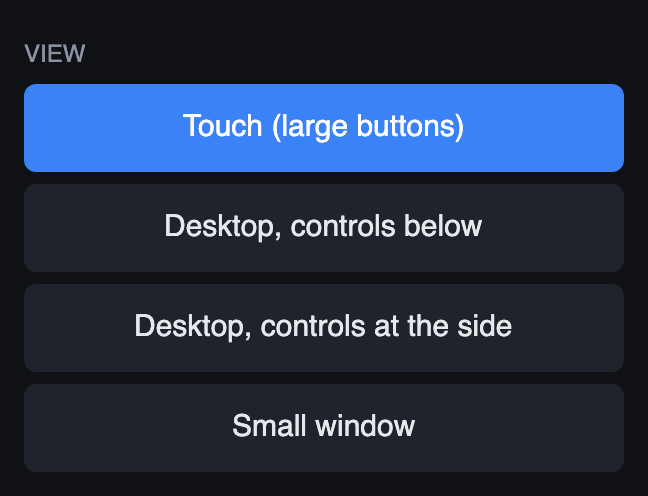
While the touch layout is on, Config, the station guide and the other windows open with the same large controls, and on a small screen they fill it.
The voice keyer buttons can be shown here too: tick "Voice keyer buttons on the touch layout" in REC's long-press panel.
Starting at login on a Raspberry Pi
Create ~/.config/autostart/simplehpsdr.desktop:
[Desktop Entry]
Type=Application
Name=SimpleHPSDR
Exec=simplehpsdr
Raspberry Pi OS also runs ~/.config/labwc/autostart; a line simplehpsdr & there does the same.
The touch layout has been tried with a mouse so far, and the autostart steps aren't tested on a Pi yet. Reports from touch-screen users are welcome.
Keeping the load down on a Raspberry Pi
A Pi has little processor to spare. When it runs short, the first sign is clicks in the receive audio. Two settings make the most difference:
- Noise reduction: use NR2, not NNR. NNR runs a neural network, and that is heavy work. On a Pi 5 receiving at 192 kHz, the receiver's signal processing took about half of one processor core with NNR and about a seventh of one with NR2. NR off costs least of all. Right-click NR to choose the method.
- Leave the close-up's High resolution off. It starts off on a Pi. With it on, the engine works out a second, fine spectrum just for the filter close-up. Right-click the close-up to change it.
The figures are from one Pi 5. A Pi 4 or CM4, such as the one inside the original G2, is slower, so both settings matter more there.
ANAN G2 on its own Pi
The ANAN G2 has a Raspberry Pi inside (a CM4 in the original G2, a CM5 in the newer one) with its own screen. SimpleHPSDR can run there, beside the G2's p2app, which talks to the radio's hardware. It installs from the same arm64 package on Raspberry Pi OS Bookworm or Trixie. The full steps are in g2-pi.md on GitHub.
- p2app must be running, with its panel option (
p2app -p). The G2's own autostart can start it. Turn off piHPSDR's autostart if it's there, as only one program can use the radio. - SimpleHPSDR can start at login a few seconds after p2app, and opens in its touch layout, full screen.
- Pick the G2 in the radio list. If it isn't listed, type
127.0.0.1as the address and choose ANAN-G2 or G2-1K.
The front panel. The G2's knobs and buttons work through p2app: the original G2 panel and the G2V2 / G2 Ultra panel. The VFO knob tunes; the other controls start with piHPSDR's layout. Config > Hardware shows whether p2app has connected and which panel it found, and lets you give any knob or button another job.
Quitting. Tap Quit at the top of the ☰ drawer, then tap it again within 4 seconds. On the original G2 panel, holding FCN quits too.
Ulanzi Dial (Mac)
A Ulanzi Dial (model D100H) can be a tuning knob and eight buttons for SimpleHPSDR, whichever window is in front. It connects over Bluetooth; its cable only charges it. On a Mac only, for now. Ulanzi's own app is not needed.
- Pair it in the Mac's Bluetooth settings, where it appears as "Ulanzi Dial".
- In Config > Hardware, under Ulanzi Dial, tick "Use the dial".
- The first time, macOS asks to allow SimpleHPSDR under Input Monitoring and Accessibility, in System Settings > Privacy & Security. Allow both, then quit SimpleHPSDR and open it again.
While SimpleHPSDR runs. As it comes, the dial changes the Mac's volume, sends media keys, types Ctrl+C, V, Y and Z, and clicks the mouse. With the dial on, none of that reaches the Mac while SimpleHPSDR is running. Quit SimpleHPSDR and the dial is its old self again. Without the Accessibility permission, pressing the dial in and turning it still clicks the mouse.
What the controls do. The dial has three jobs, and the three buttons on top choose between them. The status line says which is chosen.
| Control | Does |
|---|---|
| Top left, then turn | Tune |
| Top centre, then turn | Volume |
| Top right, then turn | Zoom |
| Press the dial in and turn | Tune ten steps at a time |
| Press the dial | Mute |
| Left side, top and rear | Band up and down |
| Right side, top and rear | Mode up and down |
Tuning follows your hand. A careful turn moves one tuning step for each click of the dial. Turn faster and each click moves several steps, up to twenty. Spin it and let go, and the frequency glides on and settles, like a flick of the panadapter; turn the dial again or press any of its buttons to stop it. A locked frequency doesn't move.
Every button and each of the dial's jobs can be given something else in Config, from the same list as the ANAN G2's front panel: filters, slices, RIT, noise reduction, bands and more. MOX and TUNE are in that list; nothing is set to transmit unless you choose it.
If the dial stops working after an update
macOS gives its permission to one exact copy of SimpleHPSDR. After an update it can still list SimpleHPSDR as allowed and yet refuse it, without asking again. The dial is paired and "Use the dial" is ticked, and nothing happens. To put it right:
- Open System Settings > Privacy & Security > Input Monitoring, select SimpleHPSDR and press the minus button under the list to remove it.
- Do the same under Accessibility.
- In Config > Hardware, under Ulanzi Dial, untick "Use the dial" and tick it again. macOS asks again: allow both.
- Quit SimpleHPSDR and open it again.
If SimpleHPSDR can't be removed from those lists, open Terminal and enter these three lines, then carry on from step 3:
tccutil reset ListenEvent com.kc2rgw.simplehpsdr
tccutil reset Accessibility com.kc2rgw.simplehpsdr
tccutil reset PostEvent com.kc2rgw.simplehpsdr